Friday, June 25, 2010

Out-of-Towners

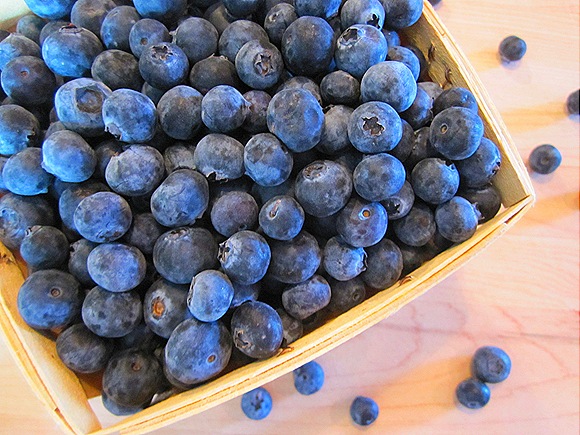
Beautiful Blueberries


We had two of our New York friends, Russ and Sam, staying with us last weekend.  Actually, they used to be our New York friends.  Now they’re our Colorado friends.  With their car jam-packed full of all their belongings, the adventurous Russ and Sam said good bye to the Big Apple, and headed out on the big drive westward, taking socially plotted pit stops not only in Chicago, but in a number of other friend-filled cities, in the midst of their month-long move.  We were thrilled to be one of their many stops along the way, and we had a blast of a weekend hanging out and eating with them.  Knowing that these two had probably had more than enough restaurant food as of late, we figured they’d enjoy some home cooking.  And so, their first night in town, we stayed in for dinner.  This was our home-cooked menu:

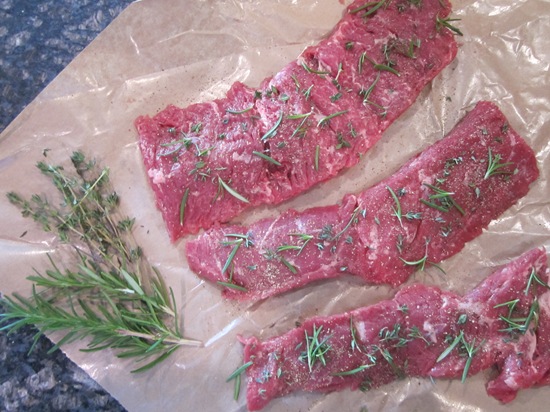
Grilled Herb-Rubbed Skirt Steak
Grilled Baby Artichoke, Pearl Onion & Potato Kebabs
Green Beans with Arugula
Kalamata Olive Aioli
 
Blueberry Gingerbread Upside-Down Cake


We’ve been crazy about grilling lately.  Can’t get enough of it this time of year.  Unfortunately, over the last few weeks, our gas grill hasn’t seemed all that enamored with us.  It just hasn’t been cooperating lately, and won’t ever get nearly hot enough.  It’s not one of those hulking, silver sorts with the raging flames and sturdy exterior.  Our cute little grill is definitely on the wimpy side of the grill spectrum, and pretty susceptible to the Chicago winds that always whip past our outside deck, even in the middle of summer.  It seems every time we cook out lately, even with a fresh tank of propane, our little grill just doesn’t stand up to the job. 

And I’ve known all this for a while now.  So why, you may ask, does this week’s menu include grilled skirt steak (a somewhat fickle cut of beef that’s notorious for needing a really hot, hot flame) and on top of that, grilled sides too!?  To tell you the truth, I have no idea.  I have no idea whatsoever what I was thinking.  Perhaps I was thinking, that I’m nearly half-way through with this once-a-week-for-a-year-dinner-party endeavor, and that since I haven’t had any major flops yet, perhaps I was indestructible.  Well, I kind of proved myself very wrong. 
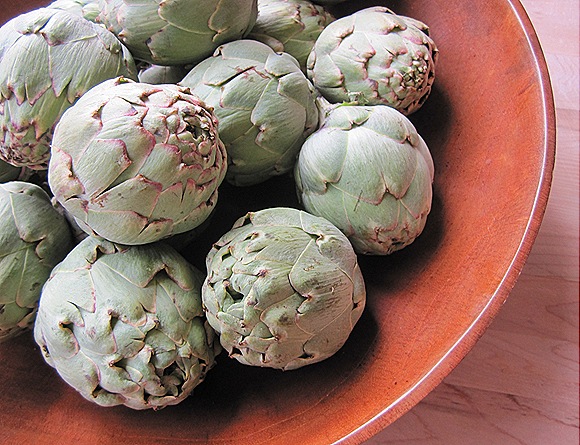
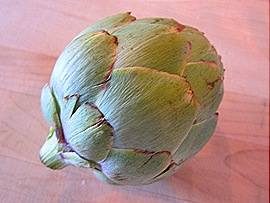
Baby Artichokes

Skirt steak has all the potential for being magnificent, but only if it’s cooked really quickly and over really high heat, to just about medium rare, no more, no less.  Needless to say, thanks in part to our weakling grill, but thanks in bigger part to my own should-have-known-better stupidity, this is not how I cooked my skirt steak.  And magnificent is not at all how it turned out to be.  I ended up having to finish the steak indoors, on a hot sauté pan.  This averted completely failure, but the end results were only okay, at best.  Russ and Sam insisted that  everything tasted great.  But I do think they were just being nice. 

The good news is that this skirt steak fiasco finally justified our long-time longing for a charcoal grill, whose top vent would make it much less susceptible to the blowing winds than our side-vented gas grill.  Aside from that, we’d been coveting charcoal grills for the incredible, smoky flavor they impart on any food that rests above their smoldering coals.  No gas grill, however convenient it may be, can ever quite compare to the smoky goodness of a charcoal grill.  So, as soon as Sam and Russ took off, we headed to Home Depot and found a great deal on the greatest Webber grill.  And man, if we were loving grilling out before, now we’re officially obsessed!
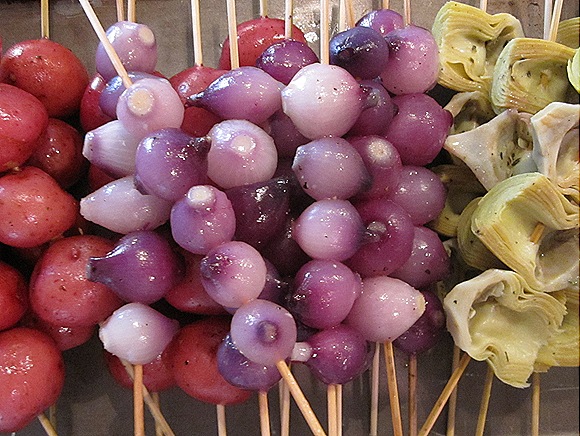
Vegetable Kebabs

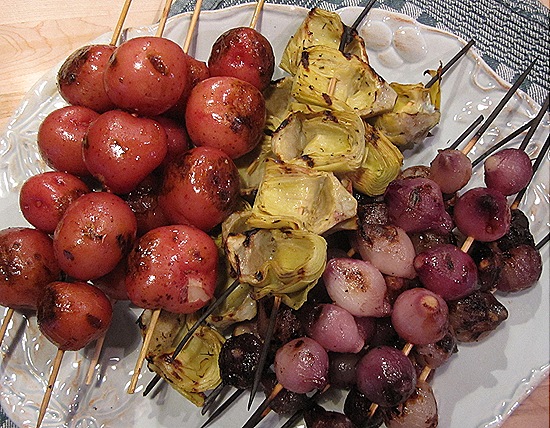
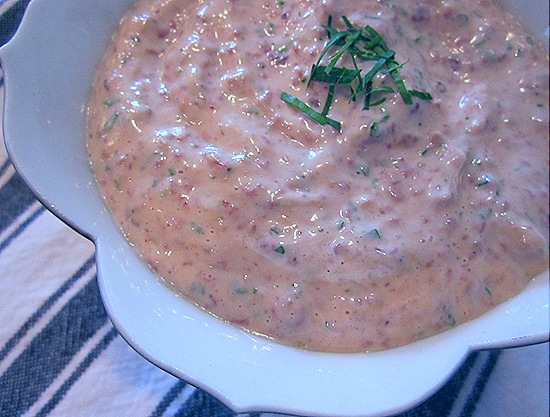
The other good news is that the vegetable kebabs, not needing near the blast of heat the steak required, turned out pretty great.  Pre-cooked a bit so they were tender on the insides, the potatoes, onions and artichokes picked up a beautiful outer char from a quick turn on the grill.  What made these colorful rows of vegetables even more tasty was the flavorful dollop of kalamata olive aioli served on the side.  This piquant concoction of briny olives, pungent garlic, zesty lemon and salty capers, folded into creamy home-made mayonnaise, was a deliciously dip-able sauce for both the grilled vegetables and the thinly sliced steak. 

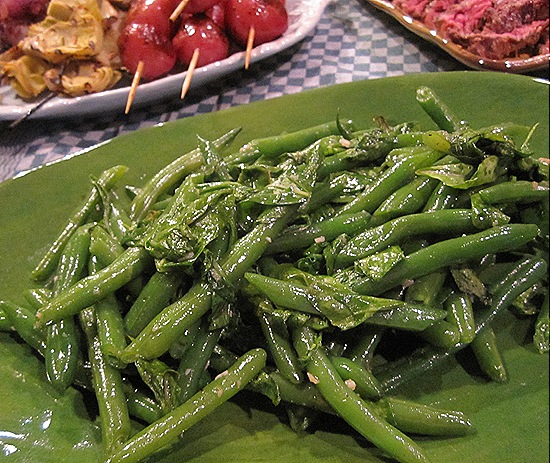
And one last addition to dinner, the green beans with arugula.  Sautéed with garlic and a touch of lemon, then tossed with a big handful of arugula, which wilted in the heat of the pan, and clung to these beans, these green beans would be a perfect side to any summer dinner.  Sometimes you just want something a little bit different from regular old green beans, and this dish certainly did the trick.  It was anything but regular.
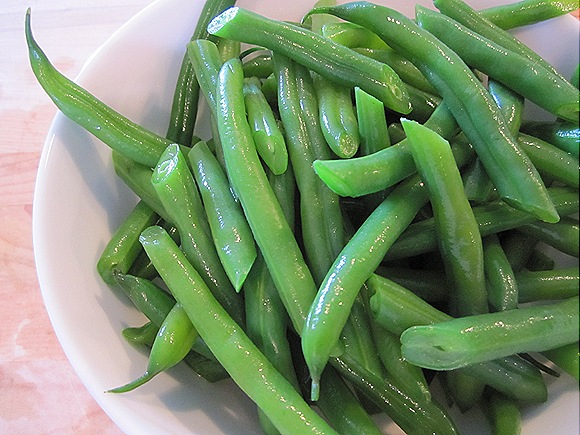
Green Beans

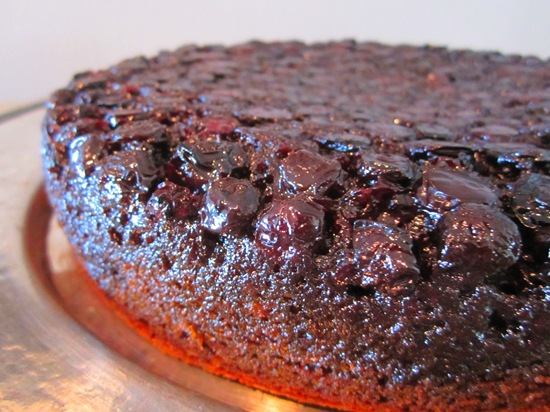
As if in atonement for the miserable steak, the delicious dessert completely made up for any main course shortcomings.  This blueberry gingerbread upside-down cake is the epitome of magnificent.  The recipe comes from a favorite dessert cookbook of mine called Luscious Berry Desserts, which is also the source for this raspberry tart that I made a while back.  And wow, are both of them incredible!  I’ve made this one at least a half dozen times.  Luscious baked blueberries sit atop the moist and tender cake, swathed in a caramelized brown sugar syrup that soaks into the warmly spiced gingerbread below.  Served just out of the oven with a scoop of vanilla ice cream melting on top, this dessert is simply incredible.  And it was a perfect way to end a night that had gotten off to not so perfect a start. 
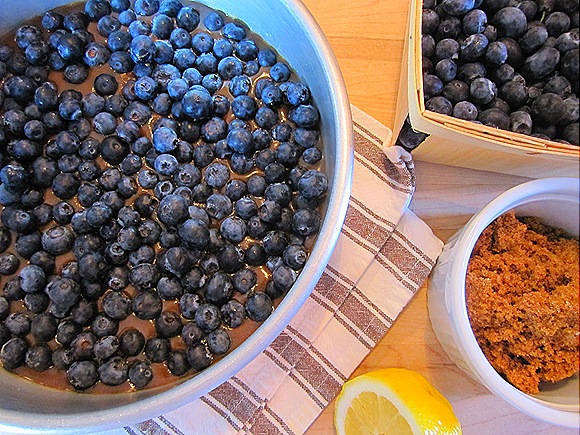
Top of the Upside-Down Cake


Grilled Herb-Rubbed Skirt Steak
Serves 4
 
Skirt steak is a cut of beef that’s best served right around medium-rare.  Any less than that and it will be too chewy.  And more than say, medium and it will turn out very tough.  Another important thing to keep in mind - slice the cooked steak very thinly, and always on a diagonal, against the grain. 
 
Herb-Rubbed Skirt Steak

2 # skirt steak
2 sprigs rosemary, leaves plucked off
10 sprigs thyme, leaves plucked off
kosher salt & freshly ground black pepper, to taste
vegetable oil, for grilling

Trim the skirt steak of any excess fat or sinew, if needed.  (But you’ll probably not need to do too much of this, if any.  Skirt streak usually comes pretty clean from the butcher.)  Pat the meat dry with paper towels, then press the rosemary and thyme leaves evenly over both sides of the streak.  Refrigerate for at least four hours, or up to one day, covered with plastic wrap.
 
Preheat the grill to very hot, about 30 minutes. Here’s a way to tell if your grill is at the right temperature.  Hold your hand right over it.  If you you can keep it there for five seconds, it’s not hot enough.  If you can’t hold it there for even half a second, it's too hot.  When the grill is hot, soak a clean rag or a bunch of paper towels with a few tablespoons of vegetable oil, and using tongs, rub it over the grill rack. 
Scrape the herbs off the skirt steak, then pat the steak dry with paper towels.  Season both sides with a good dose of salt and pepper.  Place the steak on the hottest area of the grill, over direct heat.  Cook for about 3 minutes, then flip it over and cook another three minutes, for medium-rare.  Transfer the steak to a cutting board and rest, covered loosely with tin foil, about 5 minutes.  Thinly slice the steak on the diagonal, against the grain.  Serve immediately.


Grilled Baby Artichoke, Pearl Onion & Red Potato Kebabs
Serves 4

Grilled Vegetable Kebabs 

2 tsp thyme, finely chopped
2 tsp finely grated lemon zest
2 Tbl plus 2 Tbl lemon juice, divided
1/3 cup extra virgin olive oil
about 8 baby artichokes
about 16 baby red potatoes
about 24 pearl onions
kosher salt & freshly ground black pepper, to taste
about 12 bamboo skewers, soaked for at least 30 minutes in cool water

Make the vinaigrette:
In a small mixing bowl, whisk to combine the thyme, lemon zest, 2 Tbl lemon juice a pinch of salt and a few grinds of pepper. Slowly add the olive oil, pouring in a thin stream and whisking as you pour.  Reserve.
  
Prepare the artichokes:
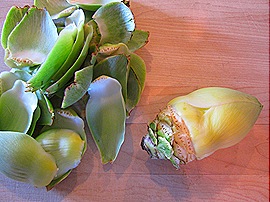
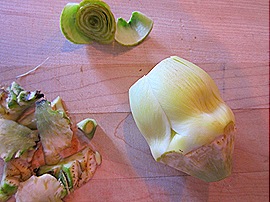
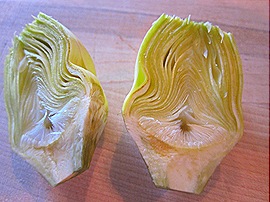
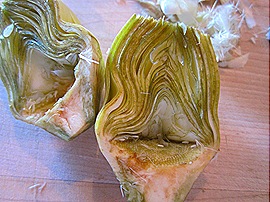
In a large bowl, combine 1 quart of cold water with the remaining 2 Tbl lemon juice, and set aside.  Working one artichoke at a time, bend back the tough, green outer leaves, snapping them off close to the base.  Continue removing several layers of leaves until the exposed leaves are pale yellow at the bottom, pale green at the top and tender.  Using kitchen shears or a very sharp knife, trim off the pointed tips of the leaves.  Cut a thin slice straight across the bottom of the stem to expose a fresh cross-section.  Trim the tough, dark green outer edges from the base and stem, exposing the tender, light green flesh beneath.  Slice the artichoke in half, length-wise.  Remove the fuzzy center, and any pointed tips of inner leaves. Place the prepared artichoke halves in the lemon water.

Whole Baby ArtichokeTough Outer Leaves Removed
                                                             whole baby artichoke                                                                        tough outer leaves removed
 
Top Sliced Off, Stem TrimmedTrimmed Artichoke, Sliced in Half
                                                                        top sliced off, stem trimmed                                           trimmed artichoke, sliced in half
 
Hairy Choke Removed
                                                                                     hairy choke removed
 
As you prepare the artichokes, bring a large pot of salted water to a boil.  When all the artichokes are trimmed, drain them from the lemon water and place them in the boiling water.  Simmer until tender, about 8 minutes.  Drain off the boiling water, then place the artichokes in a large bowl of ice water.  Allow them to rest in the ice water about 3 minutes, until cool.  Drain well, then pat dry with paper towels.
 
In a medium-sized mixing bowl, combine the prepared artichokes with about a third of the vinaigrette.  Season with salt and pepper and gently toss to coat.  Arrange four artichoke halves on each skewer, piercing the skewer twice through the leaves, near the choke.  Reserve, covered and refrigerated, until ready to grill.  

Prepare the Pearl Onions:
Bring a medium pot a water to a boil and add the pearl onions.  Simmer about two minutes, then drain.  Slice just the barest amount off the tough root end, then using a paring knife, peel off the skin. 

In a mixing bowl, combine the prepared pearl onions with about a third of the vinaigrette (about half of what’s remaining).  Season with salt and pepper and toss to coat.  Arrange six pearl onions on each skewer, piercing through the center, from side to side (not top to bottom).  Reserve, covered and refrigerated until ready to grill.

Prepare the Potatoes:
Add potatoes to a large pot of boiling, salted water and simmer until they are just tender, about 15 minutes.  Drain well.

In a mixing bowl, combine the cooked potatoes with the remaining third of the vinaigrette.  Season with salt and pepper and toss to coat.  Arrange four potatoes on each skewer, piercing them through the center.  Reserve, covered and refrigerated until ready to grill.

Grill the vegetables:
Heat the grill on high until very hot, about 30 minutes. Here’s a way to tell if your grill is at the right temperature.  Hold your hand right over it.  If you you can keep it there for five seconds, it’s not hot enough.  If you can’t hold it there for even half a second, it's too hot. 

When the grill is hot, soak a clean rag or a bunch of paper towels with a few tablespoons of vegetable oil, and using tongs, rub it over the grill rack.

Arrange the skewered artichokes, onions and potatoes directly over the heat.  Grill, turning occasionally, until grill marks appear on all sides, and the vegetables are heated through, about 3 minutes total for the artichokes and about 4-5 minutes total for the onions and potatoes. Transfer to a platter and serve hot. 


Green Beans with Arugula
Adapted from The Best of Gourmet by Ruth Reichl
Serves 4
  Green Beans with Arugula
 
1 # green beans, trimmed
1 Tbl extra-virgin olive oil
1 garlic clove, peeled and minced
about 4 cups baby arugula, stems trimmed
1/2 tsp finely grated lemon zest
kosher salt & finely ground black pepper, to taste
 
Bring a large pot of salted water to a boil.  Add the green beans and boil, uncovered, until tender, about 4-5 minutes.  Drain in a colander then plunge into a large bowl of ice water.  When cool, drain again in a colander and set aside. 
 
Heat oil in a large sauté pan over medium-high heat until hot but not smoking, about 1 1/2 minutes.  Add the garlic and sauté until golden, being careful not to let it brown, about 1 minute.  Add the green beans, lemon zest and arugula.  Season with salt and pepper and cook, tossing occasionally, until the beans are warmed through and the arugula is wilted, about 2 minutes.  Serve hot. 


Kalamata Olive Aioli
Makes about 2 cups
 
Kalamata Olive Aioli
 
2 large egg yolks
1/2 cup extra-virgin olive oil
1/2 cup vegetable oil
1 cup kalamata olives, pitted and roughly chopped
1 Tbl capers, drained
1 anchovy fillet, finely chopped
1 large garlic clove, finely chopped
1 tsp finely grated lemon zest
1 Tbl lemon juice
1/4 cup parsley, finely chopped
kosher salt & freshly ground black pepper, to taste
 
Crack the egg yolks into a large mixing bowl, and whisk until they are slightly foamy.  Slowly add the olive oil, then the vegetable oil, just a few drops at at time, constantly beating with the whisk, until all the oil is incorporated and the mixture is thick and smooth, the consistency of mayonnaise.  Set aside.
 
Add the chopped olives and capers to the bowl of a food processor.  Pulse until coarsely chopped, then scrape down the sides of the bowl with a rubber spatula.  Add the anchovy, garlic, lemon zest and lemon juice.  Pulse until finely chopped (but not pureed). 
 
Add the olive mixture to the oil mixture.  Add the chopped parsley and mix to combine thoroughly.  Taste, and season as needed with salt and pepper.  This can be stored, covered and refrigerated, for up to one day.  Serve at room temperature. 


Blueberry Gingerbread Upside-Down Cake
Adapted from Luscious Berry Desserts by Lori Longbotham
Serves 8-10
Blueberry Gingerbread Upside-Down Cake
 
1 1/2 cups all-purpose flour
1 1/2 tsp ground ginger
1 tsp ground cinnamon
1/2 tsp ground cloves
1 tsp baking soda
1/2 tsp salt
1/2 stick plus 1 stick unsalted butter, divided, room temperature
3/4 cup packed dark brown sugar
1 Tbl lemon juice
1 pint blueberries
1/2 cup granulated sugar
1/2 cup molasses
2 large eggs
1/4 cup whole milk
 
Preheat the oven to 350ᵒF.  Position a rack in the middle of the oven.
In a medium-sized mixing bowl, whisk together the flour, ginger, cinnamon, cloves, baking soda and salt.  Reserve.
 
Melt 1/2 stick of butter.  In a small mixing bowl, stir together the melted butter with the brown sugar and the lemon juice.  Pour into a round cake pan of 9-inch diameter and 2-inch height.  Sprinkle the blueberries evenly over the bottom of the pan.
Using an electric stand mixer fitted with the paddle attachment, beat the remaining stick of butter on medium-high speed until light and fluffy, about three minutes.  Add the granulated sugar and beat until light and fluffy again, about one minute more.  Scrape down the sides of the bowl with a rubber spatula, then add the molasses and beat until blended.  Add the eggs, one at a time, beating well after each addition and scraping down the sides of the bowl as necessary.  Add half of the flour mixture and mix until just combined.  Add the milk and mix until just combined.  Add the remaining flour mixture and mix until combined.  Pour the batter into the prepared pan.  Smooth out the top with a rubber spatula.
 
Bake until a wooden pick inserted into the center comes out clean, about 60-65 minutes.  Set the pan on a wire rack and cool the cake for 15 minutes.  Run a thin, sharp knife around the inside edge of the pan.  Invert the cake onto a serving plate.  
Cut into wedges and serve warm.  This goes great with vanilla ice cream.

Friday, June 18, 2010

Dessert First

Close-Up

My parents were in for a visit a few weekends ago.  I always love cooking for them, and wish so much I could do it more often.  Were Ben and I living in Toledo, I imagine myself cooking for the two of them all the time - having them over for weeknight dinners, bringing them samples of new recipes I’m experimenting with, or the left-overs from too-big-for-just-the-two-of-us desserts, and making for them all of the delicious things I can now only describe in our phone conversations.  Ah well, someday maybe.  But until that day, I’ll just have to keep on relishing their special visits, and keep on celebrating these visits with extra-special food. 

And that reminds me of something else special – the two other guests we had over this night.  Tim, a man whom my dad had recently met at a business seminar in Chicago, and his wife Maggie.  Aside from Dad and Tim’s quick meeting and mutual agreement that they’d like to meet up again, Tim and Maggie were, on the whole, complete strangers to all of us.  So when Dad had the idea to invite them over for dinner, I was, to be honest, a little nervous.  Nervous to be  cooking for people I didn’t yet know, and nervous too, that the night might turn out to be a total dud.  This kind of stranger-filled situation could easily turn out to be a more than bit awkward.  So, in the back of my mind, I was a bit afraid it wasn’t going to be all that fun of an evening.  Needless to say, I was completely wrong.  As soon as Tim and Maggie entered our apartment, all full of smiles and warmth and grace, I knew these were wonderful people, and that this was going to be a really wonderful night.  And this time, I was completely right. 

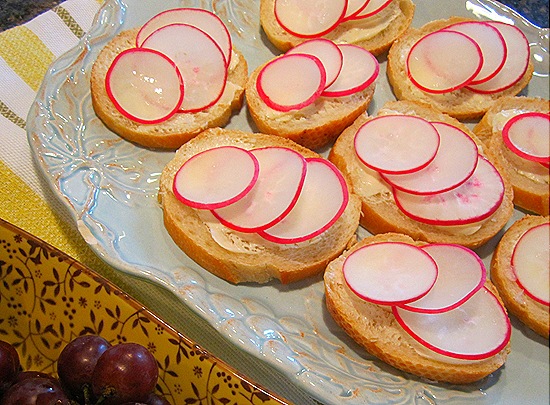
Radishes & Butter on Sliced French Bread
Baked Radicchio & Goat Cheese with Herbed Olive Oil & Crostini
 
Bacon-Wrapped Salmon with Whole-Grain Mustard
Wild Rice Risotto Cakes
Vinegary Red Cabbage and Beet Slaw
 
Black Berry-Brown Sugar Cake

When designing the menu this week, I worked backwards, deciding on dessert first, then picking and choosing the entree, sides and appetizers to go along with it.  So I think today, just to mix things up a bit, I’ll follow that pattern again, and we’ll have dessert first. 

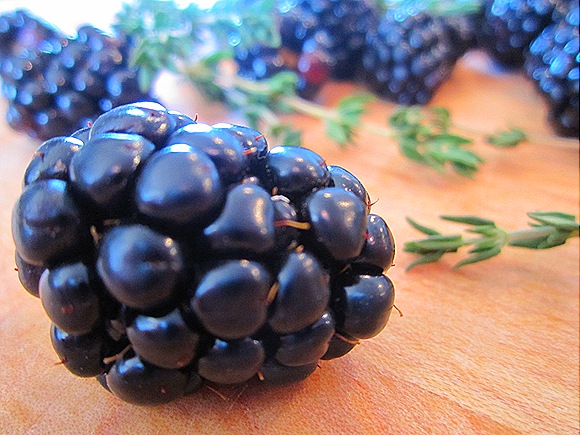
Fresh Blackberries

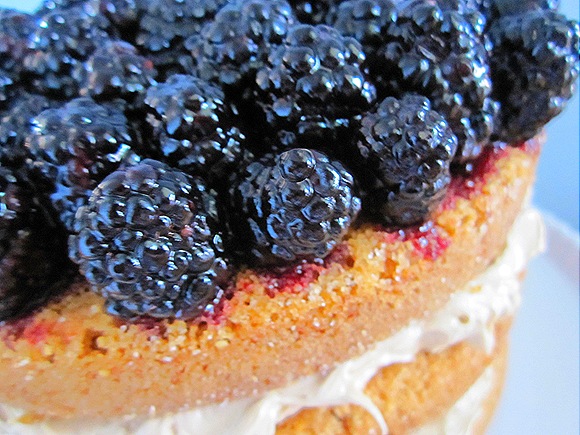
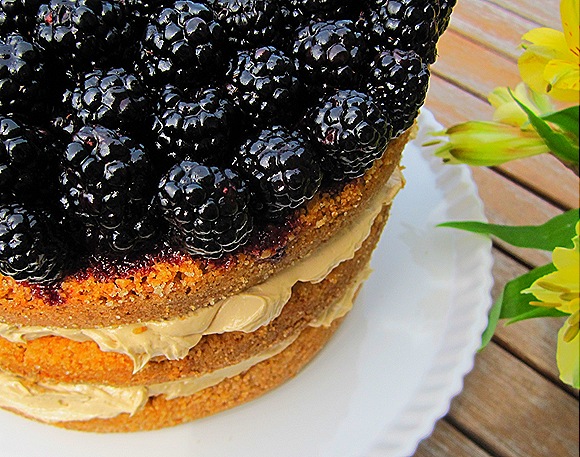
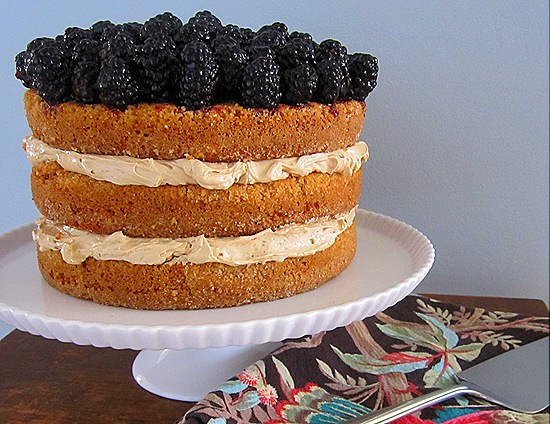
Earlier in the week, needing inspiration for this dinner party, I ended up turning to an old shoe box, sitting  way up on the top shelf in our office closet, packed full of ripped-out recipes from old cooking magazines.  In the midst of this unruly stash, I found a jagged patch of paper containing both a picture and recipe for the absolute most gorgeous cake I’d ever seen.  I’d completely forgotten about this all-too-beautiful confection, with its three-layers of walnut-brown sugar cake, its topping of fresh blackberries, and its decadent brown sugar buttercream frosting.  As soon as I stumbled upon this recipe, I knew beyond a doubt that I’d found this week’s dessert.  And I could think of hardly anything else for the rest of the week.

Blackberry - Brown Sugar Cake

Isn’t she a beauty?!  It’s one of those cakes that’s just so pretty, it’s hard to imagine it tasting as good as it looks.  But I’ll tell you honestly, that was not the case with this cake.  Not the case at all.  If anything, this cake tasted even better than it looked.  Way better.  In fact, flipping through the files of my memory, I do think this is the best cake I’ve ever made.  It was incredibly, unbelievable delicious.  First of all, the brown sugar buttercream frosting – rich and smooth and utterly luscious – was simply out of this world.  And the cake itself was just incredible.   Tender and unbelievably moist, with hints of orange lingering among the vanilla and brown sugar, each delicate layer with enclosed within a crackly crust of sugar and finely-ground walnuts.  On top of the cake glistened lovely, fresh blackberries, coated in blackberry syrup.  The sweet-tart berries were perfect companions for the sugary cake and rich, creamy frosting, making every last bite taste like pure heaven.

Bacon-Wrapped Salmon with Wild Rice Risotto Cakes & Vinegary Slaw

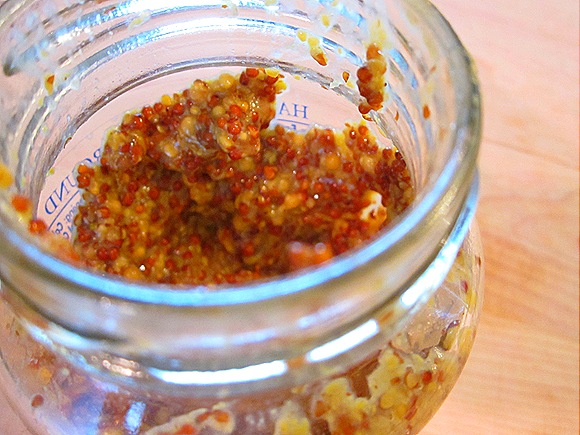
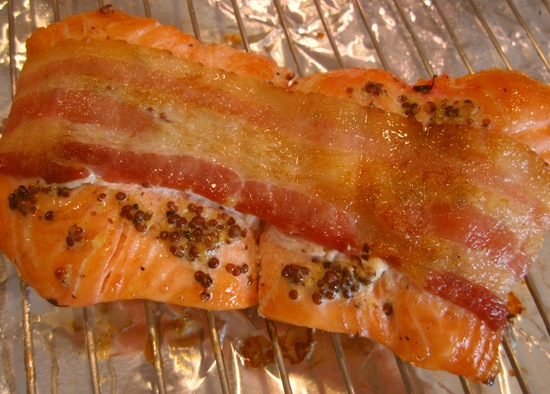
After deciding undoubtedly and all too easily on this fabulous dessert, it was a bit more difficult coming up with a fitting main course.  Thinking and thinking about it for way too long, and talking and talking about it with my incredibly helpful and wonderfully creative friend Ralph, I finally settled on bacon-wrapped salmon with whole grain mustard.  It turned out to be, just like the cake, absolutely delicious.  As the salmon cooks to a perfect doneness, the bacon crisps beneath the oven broiler, and its melting fat bastes the fish.  A light smear of whole grain mustard adds a spicy punch to the rich bacon-wrapped salmon, pleasantly taming its richness and toning down it’s decadence to the perfect level.

Whole-Grain Mustard

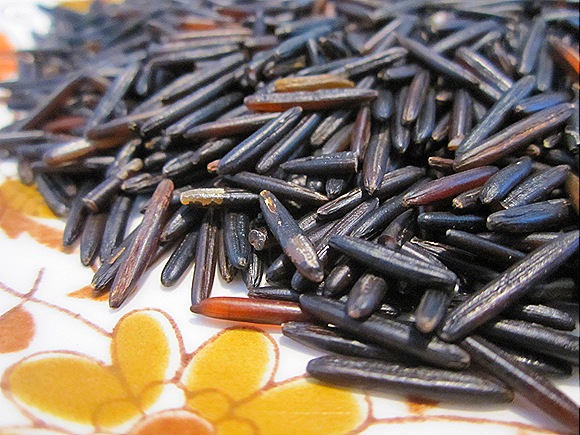
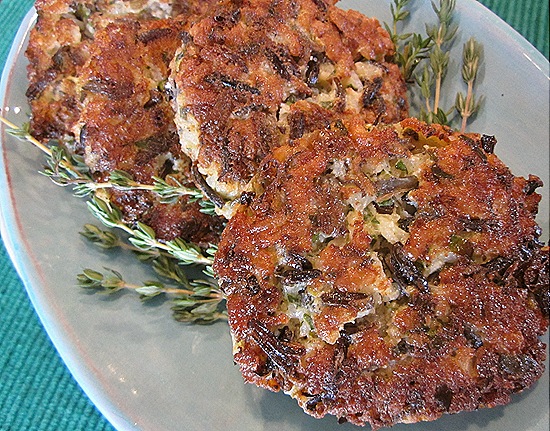
Alongside the salmon, wild rice risotto cakes.  Chewy, nutty wild rice is folded into velvety smooth risotto, along with a gigantic handful of sliced scallions, and a more modest amount of parsley and parmesan cheese.  Small scoops of this risotto batter are dropped in sizzling oil, then pan-fried to form crunchy, golden brown cakes with tender, creamy insides.  The smooth insides and crispy outsides, with chewy specks of nutty brown rice and fresh green flecks of spicy scallions, combine to make every bite of these pretty cakes downright delicious. 

Wild Rice

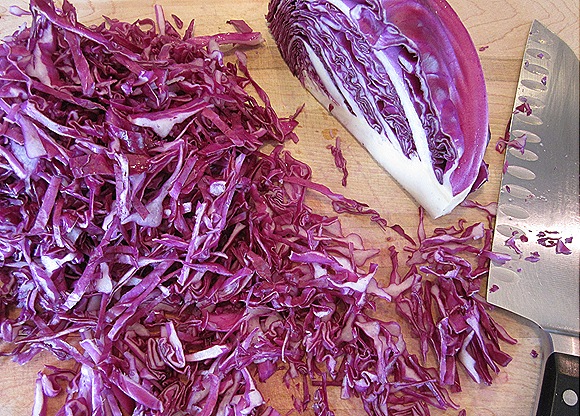
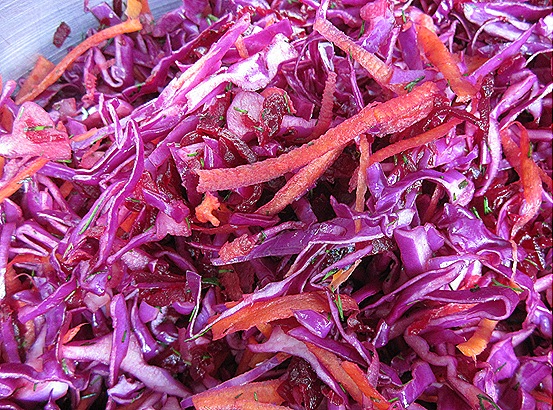
To cut the creaminess of the risotto cakes and the impressive richness of the bacon-wrapped salmon, something tart and tangy was certainly called for.  And that’s where this vinegary slaw came in to play.  Sweet beets, bright crunchy red cabbage, crunchier carrots and a puckery vinegar dressing all came together to create the perfect foil to all that lavish richness.  With its touch of mustard and bit of dill, this vibrant coleslaw would be delicious next to any rich dish.  Or any poor one for that matter.  Or even, all on its own.

Thinly Slicing Red Cabbage

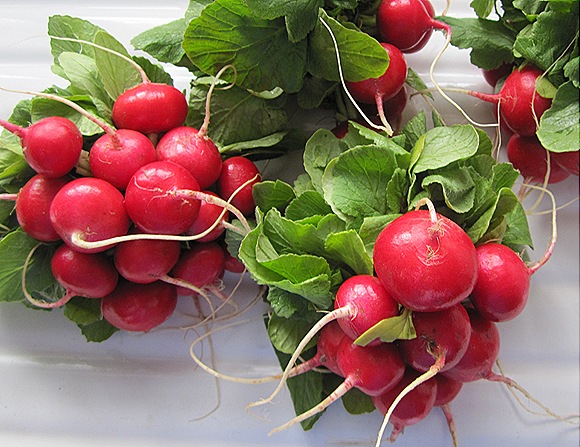
If I had a hard time making up my mind about a main course, I had an even harder one deciding on hors d’oeuvres.  In the end – i.e. in the aisles of the produce market - I finally though up what I should make to start off the night.  Some beautiful radishes reminded me of a classic and (more importantly) simple hors d’oeuvre:  French bread with butter, sliced radishes and sea salt.  It’s hard to imagine, and also hard to describe, how tasty these simple little open-faced sandwiches are.  You’ll just have to try them out for yourself.  Lucky for you, this will be quick and easy to do!
 
Radishes
 
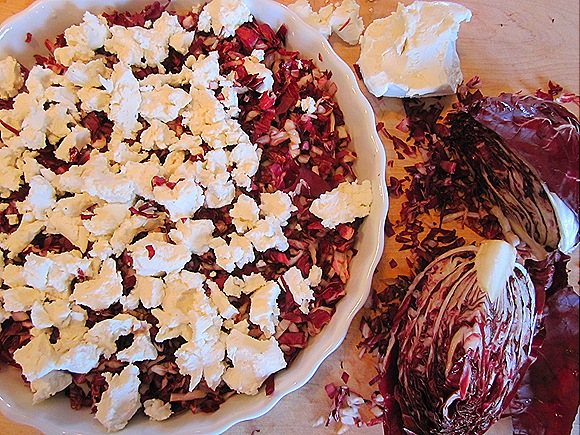
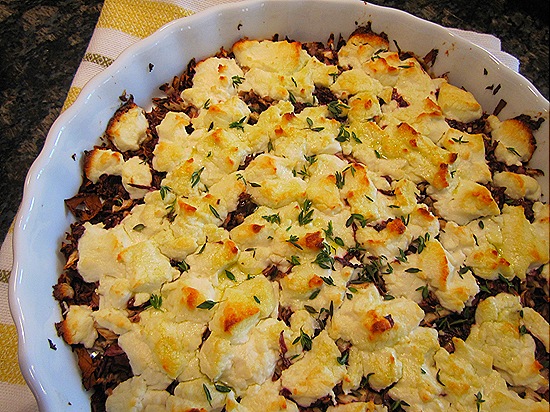
The other hors d’oeuvre I served this night, was nearly as quick and easy as the first.  A crumbling of creamy goat cheese topped a quick shredding of radicchio, then got popped into a hot oven, until it was hot and melty and golden brown on top.  Fresh out of the oven, it was drizzled with a fragrant herb-infused olive oil and sprinkled with a pinch of fresh thyme leaves.  With some crunchy French bread crostini served on the side, this baked goat cheese was a delicious and sophisticated dip, a perfect start to a meal that started with a perfect dessert. 
 
Radicchio & Goat Cheese
 
 
Radishes & Butter on Sliced French Bread
Serves 4
 
Radishes & Butter on Sliced French Bread
 
about 1/2 a French baguette
great quality butter, unsalted, room temperature (I like this brand.)
flaky sea salt (I love this brand.)
1 bunch radishes, trimmed and thinly sliced
 
Slice the baguette cross-wise into 1/4-inch thick slices.  Spread butter liberally over the bread slices, then sprinkle with the salt.  Top with the sliced radishes.  Serve immediately.


Baked Radicchio & Goat Cheese with Herbed Olive Oil & Crostini
Adapted from Bon Appétit Magazine, May 1990
Serves 6
         
Baked Radicchio & Goat Cheese with Herbed Olive Oil 
1/4 cup extra-virgin olive oil
2 garlic cloves, peeled & smashed
1 sprig rosemary
4 sprigs thyme
1 large head radicchio, thinly sliced (about 2 cups)
kosher salt & freshly ground black pepper, to taste
12 oz creamy goat cheese, crumbled
1 tsp fresh thyme leaves
about 30 French bread crostini (from about 1/2 a baguette)
 
Combine the olive oil and garlic in a small saucepot.  Place over medium heat and cook until the garlic is golden, about 10 minutes.  Turn off the heat, then add the rosemary and thyme sprigs, submerging them beneath the oil.  Allow the oil-garlic-herb mixture to rest at room temperature 1 hour.  Strain, discarding the garlic and herbs and reserving the oil.  The flavored oil can be made a day or two ahead and stored at room temperature in an airtight container. 
 
Preheat the oven to 400ᵒF.  Arrange the sliced radicchio over the base of a shallow baking dish.  (I used a 10-inch wide circular ceramic dish.)  Sprinkle with a pinch of salt and a few grinds of pepper.  Crumble the goat cheese evenly over the radicchio.  Bake until the cheese begins to melt, and the top is lightly golden brown, about 15-20 minutes.  Remove from the oven, drizzle with a couple tablespoons of the herbed olive oil and sprinkle with the thyme leaves.  Serve hot with the crostini on the side.


Bacon-Wrapped Salmon with Whole-Grain Mustard
Serves 4
 
Bacon-Wrapped Salmon with Whole-Grain Mustard
 
4 6-0z skinless filets of salmon (about 2 inches wide)
4 tsp whole-grain mustard
4 slices bacon
kosher salt & freshly ground black pepper
8 wooden toothpicks
 
Preheat the broiler on high, and arrange an oven rack 4-inches under the broiler.
 
Pat the salmon filets dry with paper towels, then season with salt and pepper.  Spread 1 tsp mustard evenly over the top (the pretty, presentation side) of each filet.  Trim each bacon slice so that it’s just slightly longer than the length of the salmon filets.  Lay one slice of bacon length-wise over each fillet.  Using two toothpicks per fillet, secure the bacon to the salmon, at each end of the fillet. 
 
Arrange the fillets, bacon-side up, on a wire rack placed over a foil-lined baking pan.  (Arrange the fillets in a straight line down the center of the rack, so that they fit evenly under the broiler flame.)  Broil for about 7 minutes, until the bacon is crispy and golden.  Flip the fillets over, then place under the broiler again.  Bake until the fish is just cooked through, about 3 minutes more.  Remove the toothpicks from the ends of the salmon fillets, then serve immediately.  


Wild Rice Risotto Cakes
Makes about 12 cakes
 
Wild Rice Risotto Cakes
 
1 quart (4 cups) water
2 tsp kosher salt
1/2 cup wild rice
1 Tbl extra-virgin olive oil
1 Tbl butter
1 cup chopped yellow onion (about 1 large onion)
1 bunch green onions, thinly sliced, white and green parts separated
1 Tbl chopped fresh thyme
1 small garlic clove, finely minced
1 1/4 cup Arborio rice
3-4 cups chicken stock or vegetable stock, hot
1/4 cup sherry
1/2 cup finely-grated parmesan
1/4 cup chopped fresh parsley
2 large egg yolks, lightly whisked
about 1/2 cup extra-virgin olive oil, for pan-frying
kosher salt & freshly ground black pepper, to taste
 
Combine 1 quart water and 1 tsp salt in a medium-sized saucepot.   Bring to a boil over high heat, then add the wild rice.  Simmer, covered, and stirring occasionally, 60 minutes. Drain and reserve the wild rice.
 
Heat the olive oil and butter in a medium-sized pot over medium heat, until the butter is melted.  Add chopped yellow onion and the sliced green onions (white parts only).  Season with a good pinch of salt and a few good grinds of pepper.  Sauté, stirring occasionally, until softened and translucent, about 5-7 minutes.  Add the chopped thyme and minced garlic, and continue to cook, stirring frequently, about 2 minutes more.  
 
Add the Arborio rice and cook over medium heat, stirring constantly, about 2 minutes.  Stir in about 1/2 cup of heated stock, and simmer, stirring frequently, until the stock is absorbed.  Continue adding stock, 1/2 cup at a time, stirring frequently as it simmers, and letting each cup be absorbed before adding another, until the rice is tender but still just a bit al dente, about 20-25 minutes.  (You may not need all the stock.) Stir in the sherry, and simmer until absorbed.  Remove the risotto from the heat, add the grated parmesan, and stir vigorously to combine.  Taste the risotto, and season as needed with salt and pepper
 
Add the cooked wild rice, the sliced green onions (the green parts now), and the chopped parsley to the risotto.  Using a rubber spatula, fold everything together until well combined.  Allow the mixture to cool, about 15 minutes, then stir in the egg yolks, mixing thoroughly with the rubber spatula.  Chill the risotto in the refrigerator, covered with plastic wrap, for at least 4 hours, and up to 1 day. 
 
Heat about 2 Tbl olive oil in a large non-stick sauté pan until very hot, but not smoking.  (You can test the heat of the pan by dropping just a small bit of batter into the oil.  You’re hoping for a gentle sizzle.  No sizzle at all means the pan and oil aren’t hot enough yet, so give it a bit more time.  If the bit of batter burns right away, the pan is too hot, so lower the heat.)  Place four 1/4-cup sized scoops of rice batter into the pan one at a time, using your hands to flatten them into disk shapes (about 3-inches wide and 1/2-inch thick) just before lowering them into the pan.  Cook until the cakes are golden brown on the bottom side and they lift easily from the pan with a metal spatula, about 5 minutes. (Resist the urge to touch these before they’re done.  Don’t force them up from the pan with the spatula, or you’ll have a mess.  They’ll life easily when they’re ready.)  Lower the heat if the cakes are browning too quickly.  Carefully flip the cakes over using a metal spatula, and cook until golden brown on the bottom, about 4 minutes.  Transfer the cakes to wire rack placed over a baking pan.  Repeat these steps to pan-fry the rest of the cakes, wiping the sauté pan clean with paper towels between batches, and adding more oil as needed.  This pan-frying step can be done ahead of time, by about eight hours.  Keep the cakes refrigerated and covered with plastic.  Warm to room temperature before continuing.
 
At dinner time:  Preheat the oven to 450ᵒF.  Place the pan of rice cakes into the oven and bake until hot and sizzling, about 7-8 minutes.  Serve hot.


Vinegary Red Cabbage & Beet Slaw
Serves 6
 
Vinegary Red Cabbage & Beet Slaw
 
2 medium-sized beets
1/4 cup plus 2 Tbl apple cider vinegar
2 Tbl sugar
1 Tbl whole grain mustard
1/3 cup vegetable oil
6 cups thinly sliced red cabbage (about 1/2 a large head)
1/2 cup finely chopped red onion, soaked in cool water for 15 minutes then drained *
3 large carrots, peeled, coarsely grated (about 3 cups)
1/4 cup chopped fresh dill
kosher salt & freshly ground black pepper, to taste
 
Preheat the oven to 400°F. Cut off and discard the stem and tails of the beets. Wrap each beet in foil and place on a sheet pan. Roast until a toothpick can easily be poked into the center of the beets, about 1 to 1 1/2 hours. Cool.  When beets are cool enough to handle, peel them.  (The skins should easily slide off – you shouldn’t even need a vegetable peeler, just use your hands.)  Using the large holes of a vegetable grater, coarsely grate the beets.
 
Combine the apple cider vinegar, sugar and mustard in a large mixing bowl.  Season with a good pinch of salt and a few good grinds of pepper.  Slowly add the vegetable oil, pouring in a thin stream and whisking as you pour.  Add the sliced cabbage, chopped onion, grated carrots, dill and grated beets to the dressing, season with salt and pepper, and toss well to coat.  Let stand for about 45 minutes, tossing occasionally.  Taste, and season as needed with more salt or pepper.  Serve at room temperature. 
 
* This tempers some of the onion’s pungency.


Blackberry-Brown Sugar Cake
Adapted from Gourmet, September 2006
Serves 10
 
Blackberry-Brown Sugar Cake
 
For the blackberry syrup:
1 # blackberries (about 3 1/2 cups)
1/2 cup granulated sugar
1 tsp fresh lemon juice
 
For the cake:
2 oz walnuts (2/3 cups)
1 cup granulated sugar, divided
2 sticks unsalted butter, softened, plus more for greasing the cake pans
2 cups all-purpose flour
1 1/4 tsp baking soda
1 tsp salt
1 cup buttermilk, well shaken
1 tsp finely grated orange zest
2 Tbl fresh orange juice
1 1/2 tsp vanilla
1 cup light brown sugar, packed
2 large eggs
 
For the buttercream frosting:
3 large egg whites, room temperature
1/4 tsp salt
3/4 cup dark brown sugar, packed
1/3 cup water
3 sticks unsalted butter, cut into pieces and softened
1 1/2 tsp vanilla
 
For assembling the cake:
1 # blackberries (about 3 1/2 cups)
 
 
Make the blackberry syrup:
Combine the blackberries and sugar in a medium-sized saucepot and mash using a potato masher or fork.  Cook over medium-high heat, stirring occasionally, until slightly thickened, about 10-12 minutes.  Stir in the lemon juice.  Strain through a mesh sieve, pushing down on the solids to extract as much juice as possible.  Discard the seeds.  Chill the syrup in the refrigerator, until softly set, about 15 minutes.  This can be made at least a day ahead and kept refrigerated in an air-tight container.  Bring to room temperature before using. 
 
Make the cake
Preheat the oven to 350ᵒF and arrange the racks in the upper and lower thirds of the oven.
 
Using a food processor, pulse the walnuts with 1/2 cup sugar until finely ground.  Generously butter 3 8-inch round cake pans.  (It’s okay to use 9-inch pans too, but your cake won’t be as tall.)  Divide the walnut-sugar mixture between the three pans (about 1/3 cup per pan).  Tilt the pans to coat the bottoms and sides with the walnut-sugar mixture, letting the excess remain over the bottom of the pans.
 
In a medium-sized mixing bowl, combine the flour, baking soda and salt.  Whisk to thoroughly combine.  In a separate small mixing bowl, stir together the buttermilk, orange zest, orange juice and vanilla.
 
Using an electric stand mixer with the paddle attachment, beat together the butter (2 sticks), light brown sugar, and the remaining 1/2 cup of granulated sugar, on medium-high speed, until pale and fluffy, about 5 minutes.  Add the eggs, one at a time and beating well after each addition.  Reduce the speed to low and add the flour and the buttermilk mixtures alternatively in batches, beginning and ending with the flour mixture.  Mix just until the batter is smooth.  Divide the batter evenly among the three cake pans.
 
Bake, rotating the position of the pans about half-way through baking, until the edges begin to pull away from the sides of the pan and a wooden skewer inserted into the center of the cakes comes out clean, about 30 minutes.  Cool the cakes in the pans, placed on wire racks, for 15 minutes.  Then run a thin knife around the edge of each pan.  Invert racks over the pans, then flip the cakes onto the racks.  Cool completely to room temperature, about 1 hour.  The cake layers can be baked up to 2 days ahead and kept at room temperature, wrapped in plastic.
 
Make the buttercream frosting:
Place the egg whites and salt into the bowl of an electric stand mixer, fitted with the whisk. 
 
Combine the the dark brown sugar and water in a small saucepot.  Bring to a boil over medium-high heat, stirring until the sugar is dissolved.  When the sugar syrup begins to boil, start beating the egg whites at medium-high speed until they just hold soft peaks (When you stick a spoon into the cream and lift it out, a point will form then droop down after a second or two). (Do not beat them again until the sugar syrup is ready.)
 
Meanwhile, continue boiling the sugar syrup until it reaches 238-242ᵒF.  Immediately remove it from the heat and with the mixer at high speed, slowly pour the hot syrup into the egg whites (avoid the beaters), beating constantly.
 
Continue to beat the meringue, scraping down the bowl with a rubber spatula once or twice, until the meringue is cool to the touch, about 10 minutes.  (It is very important the the meringue is cool before continuing, or the butter will melt!!!) 
 
With the mixer at medium speed, gradually add the butter to the meringue, 1 piece at a time, and beating well after each addition until it is well incorporated.  Continue beating until the buttercream is smooth.  (The mixture may look curdled and thin before all the butter is added.  But don’t worry – it will come back together as the beating continues.)  Add the vanilla and beat 1 minute more.  The buttercream can be made ahead and chilled in an air-tight container for up to 1 week.  Bring to room temperature and beat with an electric mixer until smooth before using.
 
Assemble the cake
Put 1 cake layer, nut-side up, on a cake platter.  Spread half of the buttercream (about 1 1/2 cups) on the top, but not on the sides.  Top with a second cake layer, nut-side up.  Spread the top with the remaining 1 1/2 cups buttercream.  Top with the remaining cake layer, nut-side up. 
 
Gently toss the whole blackberries with the syrup in a mixing bowl.  Arrange the blackberries, stemmed sides down, on top of the cake.  The assembled cake with keep at room temperature, loosely covered, for 1 day.  

Thursday, June 10, 2010

A Monday Night Dinner Party

Citrus

We had Jenn over again last Monday night, and she brought along her photographer friend Jason.  It’s always such a treat, having a real photographer come to dinner – I pick up tips and learn new tricks, and get to relax a bit as I leave some of the photo responsibilities to our guest.  (You’ll see one of Jason’s awesome pictures below.  Thanks again, Jason!

Citrus-Vodka Cocktails
Crostini with Goat Cheese and Olive Confit
 
Garlic & Herb Chicken Grilled Under a Brick
Asparagus Panzanella
Bitter Greens Salad
 
Orange-Chocolate Mousse

We started out the evening with some citrus cocktails.  I’ve recently become absolutely enamored with specialty cocktails.  And this is after thirty years of being completely oblivious.  For the first three decades of my life, certain the alcohol taste would be much too strong, I stubbornly refused to try mixed drinks, just stuck with wine and the occasional beer.  But a few weeks ago, I don’t know what got into me, but I tried a guava martini at Roy’s.  It was absolutely sensational!  And my self-imposed cocktail-ban was immediately lifted.  Since that night, I’ve gotten into experimenting with all sorts of boozy concoctions.  It’s a lot like cooking – mixing special ingredients and certain flavors to created something delicious.  And it’s just so perfect, having these weekly dinner parties, because they give me the perfect chance to practice this new hobby!

This citrus-vodka cocktail was really lovely.  It’s nothing more than freshly squeezed juice from oranges, grapefruits, lemons and limes, mixed with vodka.  The color is surprisingly beautiful, a soft blending of the pink, orange, green and yellow.  Sugar lines the rim of the glass, and lends a perfect touch of sweetness to every sip. 

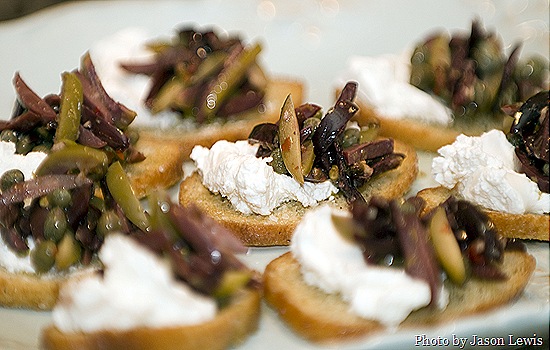
With the cocktails I served an easy hors d’oeuvre, bite-sized toasted French bread crostini, each topped with a dollop of goat cheese and a spoonful of olive confit.  For the confit, I sliced a few different varieties of green and purple cured olives – Kalamata, Arbequina, Picholine.  To these various bright and briny flavors I added some lemon zest, capers, garlic, pink peppercorns, crushed red pepper, and a splash of fruity olive oil.  The flavors are wonderful together, and made only more so when combined with the tangy goat cheese and buttery crostini.  It’s an easy snack to whip up, but it doesn’t taste at all ordinary.  The peppercorns, I think, particularly give this mixture a touch of something special, something everyone will notice.  I love these little bites, and make them all the time.  No matter what’s for dinner, they more often than not seem like a perfect way to start the meal. 

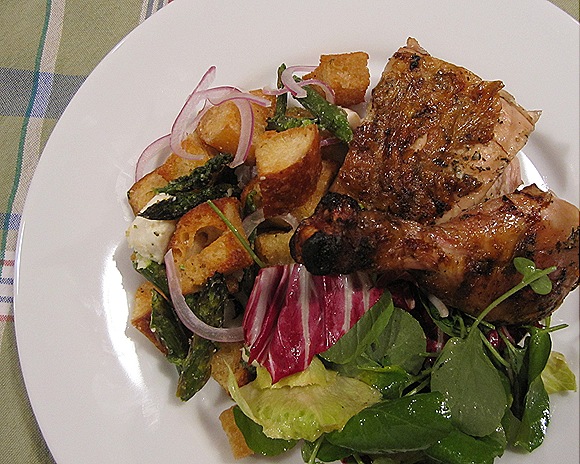
Grilled Chicken with Asparagus Panzanella & Bitter Greens Salad

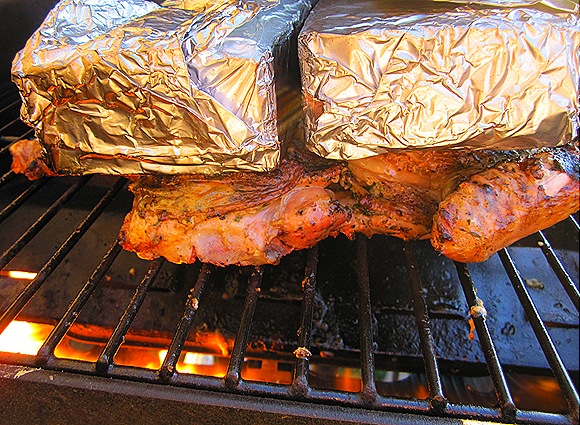
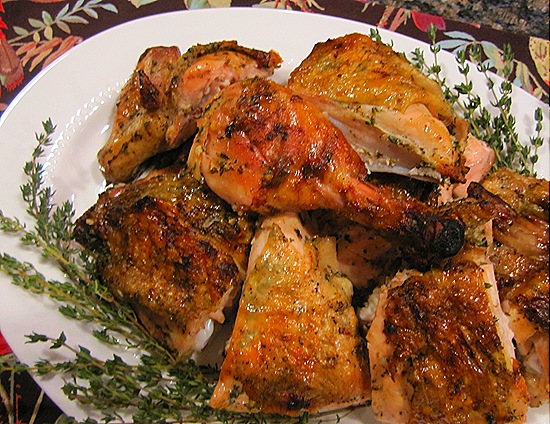
Chicken can be a little boring.  But not if your grilling it under a brick!  I had fun experimenting with this unusual technique.  First I prepared the chicken – With a few easy slices, I ‘butterflied’ the bird so it could lay flat over the grill, and then rubbed a fragrant mixture of garlic and herbs under the skin.  I heated up the bricks along with the grill, then arranged the chicken over the cool side of the grill, with the hot bricks on top of the bird, pressing it flat over the hot grates and licking flames.  A little under an hour later, the chicken was ready.  And the results were fabulous.  The garlic and herb flavors penetrated deep into the meat, filling each bite with savory complexity.  The meat was cooked to perfection, tender and juicy, like the best roasted chicken.  And the golden skin carried all the benefits of grilling, all crispy and browned, with smoky char-grilled flavor.  Absolutely delicious - and anything but boring. 

Chicken Grilled Under a Brick

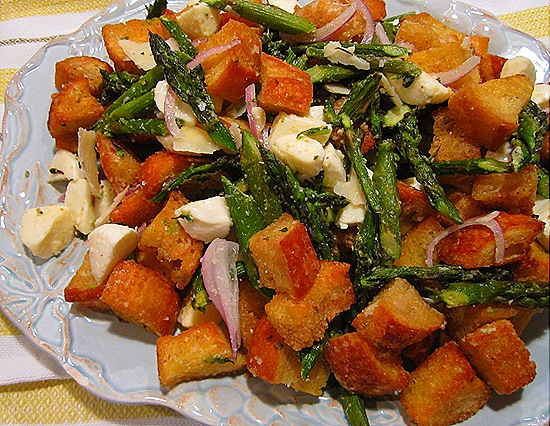
For a side dish - Asparagus Panzanella, a spring twist on an Italian bread salad.  It’s one of my favorite dishes, and a great idea that I picked up from an old chef of mine.  Cubes of crusty bread are tossed with red wine vinaigrette (which soaks through just a bit, making the bread the slightest bit soggy, saturating it with flavor) and finely grated parmesan (which sticks to the bread, coating the cubes with a dusty layer of cheese).  These vinaigrette-soaked, parmesan-coated bread cubes are then baked in the oven, until they’re toasty, warm and golden, crispy and crunchy but still soft and chewy on the inside.  To these delicious, golden cubes of toasted bread I add tender slices of roasted asparagus, a small handful of thinly sliced red onion, bite-sized bits of fresh mozzarella, and an extra dose of parmesan, for good measure.  The combination is out of this world.  It’s really one of my favorite side dishes ever.  So much so, that sometimes it even surpasses it’s side-status, and I serve it all on its own, as the main course for a light dinner.

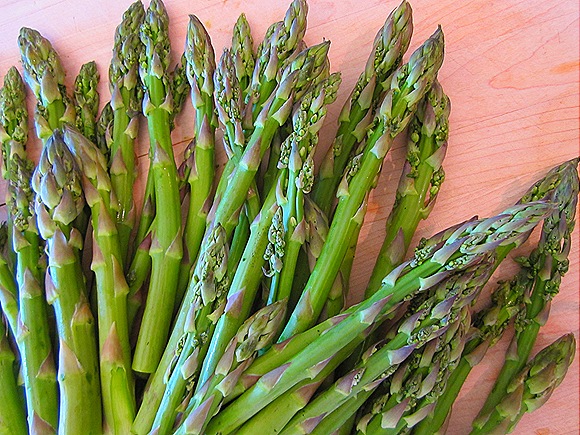
Asparagus

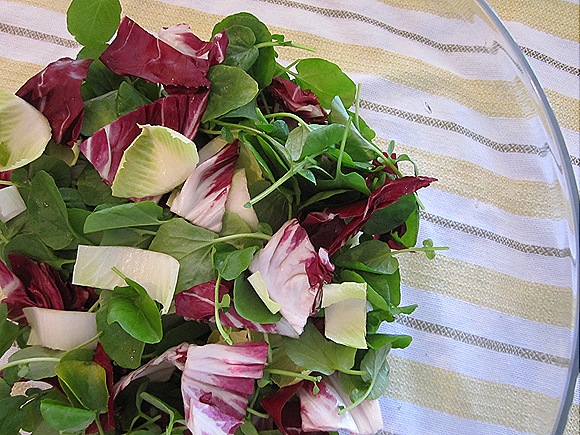
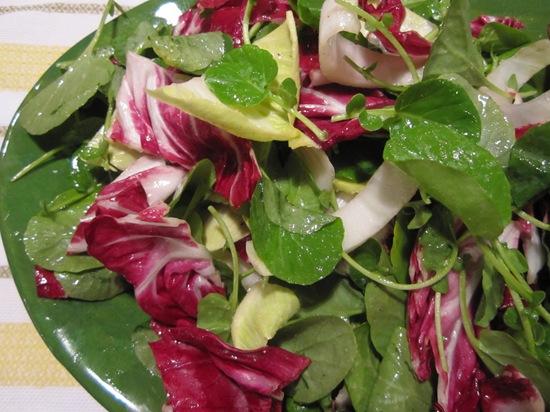
I made a second side dish that was really too simple, kind of ordinary even, but still delicious, and  perfectly suited with the chicken and panzanella – a super quick and easy salad of bitter greens – arugula, radicchio and endive.  I don’t think I need to say too much about it, really.  I write about salads pretty similar to this all the time, nearly every week.  This was just a subtle variation on a common theme.

Radicchio, Arugula & Endive

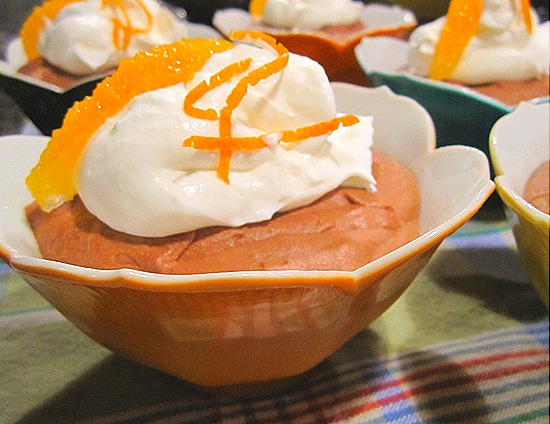
Dessert though, this was worth going on about.  Orange-flavored chocolate mousse.  Now, chocolate is something that matches up sensationally with all kinds of other flavors – peanut butter, caramel, strawberries, coffee, etc…  But my all-time favorite partner for chocolate has got to be oranges.  Have you ever tried one of those chocolate oranges?  Oh my goodness, I can never resist those!  So when I found this recipe for orange-flavored chocolate mousse in one of my Ina Garten cookbooks, I couldn’t resist trying that out either.  And am I ever glad I did.  It turned out absolutely awesome.  Let’s forget about the orange for a second, and look at this just as chocolate mousse.  Just by chocolate mousse standards, this was absolute perfection – rich and creamy, intensely chocolaty, and utterly silky smooth.  But with the addition of a bit of orange zest and a citrusy splash of Grand Marnier, it was over the top.  Wow.  That’s all I can really say about it – Wow! You’ve got to try this.  And now!

Orange 

Citrus-Vodka Cocktails
Adapted from Barefoot Contessa Back to Basics by Ina Garten
Serves 4
 
Citrus-Vodka Cocktails
 
1/2 cup freshly squeezed orange juice (from about 2 oranges)
1/2 cup freshly squeezed pink grapefruit (from about 2 grapefruit)
1/4 cup freshly squeezed lemon juice (from about 2 lemons)
1/4 cup freshly squeezed lime juice (from about 2 limes)
1 cup good quality vodka
an extra slice of lemon
about 2 Tbl granulated sugar
ice cubes
 
Rub the sliced lemon along the rims of 4 drinking glasses (martini glasses if you have them), leaving a film of lemon juice just along the edge.  Spread the sugar over the base of a small dish, then dip the lemon-rimmed glasses into the sugar.  Set aside to dry. 
 
Combine the fruit juices and vodka in a pitcher, and keep cold in the refrigerator.  When ready to serve, fill the sugar-rimmed glasses with ice cubes.  Place additional ice cubes in a cocktail shaker, then fill the shaker about 3/4 full with the cocktail mixture.  Shake for at least 30 seconds.  (It’s important to give this a really good, thorough shake to get the drink really cold, and to dilute it with melted ice.)  Pour into the sugar-rimmed glasses.  Repeat filling the shaker with ice and cocktail mixture until all the drinks are filled. 
Serve immediately. 


Crostini with Goat Cheese and Olive Confit
Serves 4-6
 
Crostini with Goat Cheese & Olive Confit
 
1/2 # mixed olives (mostly kalamata, but not regular black olives)
1/4 cup capers, drained and rinsed
1/4 cup extra-virgin olive oil
2 small-medium garlic cloves, finely minced
1 Tbl lemon juice
grated zest of 1 lemon
1 tsp pink peppercorns, roughly chopped
pinch crushed red pepper flakes
about 24 French bread crostini (from about 1/3 baguette)
about 4 oz goat cheese (make sure it’s creamy, not crumbly)
 
Remove the pits from the olives, then slice the olive flesh into long slivers.  (I do this as one step, making four length-wise slices against the central pit to create four ‘petals’ of olive flesh, which I then slice length-wise into slivers.)  Mix the sliced olives with the capers, olive oil, minced garlic, lemon juice and zest, crushed peppercorns and red pepper flakes.  Store refrigerated in an air-tight container up to 1 week. 
 
Top each crostini with a dollop (about 1/2 Tbl) goat cheese, and then a dollop (about 1/2 Tbl) of the olive mixture. I like to position the goat cheese toward one side of the crostini, then smear it a bit towards the other end, and place the olive mixture on the other side, over the smear, which should keep it from slipping.  Serve immediately.


Garlic & Herb Chicken Grilled Under a Brick
Adapted from Cook’s Illustrated Magazine, May 2009
Serves 4
 
Herb-Marinated Chicken Grilled Under a Brick
 
1/4 cup extra-virgin olive oil
8 medium garlic cloves, minced
1 tsp finely grated lemon zest (from 1 lemon)
pinch crushed red pepper flakes
1 Tbl thyme, chopped
1 Tbl rosemary, chopped
1 Tbl kosher salt, plus more to taste
1 tsp ground black pepper, plus more to taste
1 whole chicken (3 3/4 – 4 1/4 #)
vegetable oil, for grilling
 
Make the garlic-herb rub: In a small sauce pan, combine the olive oil, garlic, lemon zest and pepper flakes.  Bring to a simmer over medium-low heat.  Simmer, stirring frequently, for about 3 minutes, until the garlic is fragrant but not browned.  Add the thyme and rosemary and cook about 30 seconds longer.  Turn off the heat, then strain the mixture through a fine mesh sieve, pushing on the solids to extract the oil, and collecting the oil in a small bowl.  Transfer the solids to a second small bowl.  Reserve both bowls.
 
Prep the chicken: Rinse the whole chicken, inside and out, in cool running water, then pat dry with paper towels.  Using kitchen shears, cut through the rib bones on both sides of the background, cutting straight against the backbone, along on side then the other.  Discard the backbone.  Flip the chicken over, then push down on the breasts to flatten the breastbone.  (This is called ‘butterflying’ the chicken.)  Tuck the wings back, folding the tips beneath the other wing bones. 
 
Running your hands over the meat and beneath the skin, loosen the skin over the breast and thighs.  Trim away any excess skin or fat.  Stir to combine 1 Tbl salt and 1 tsp pepper with garlic-herb mixture.  Spread the salt-garlic-herb mixture evenly under the skin over the breast and thigh meat.  Sprinkle another 1 tsp salt and a good pinch of pepper over the bottom side of the chicken.  Place the chicken skin-side up on a wire rack placed over a baking sheet.  Refrigerate 1-2 hours. 
 
Heat the grill:  Turn all burners to high.  Wrap 2 bricks tightly with foil and place them on the cooking rack.  Cover the grill with the lid and heat until very hot, about 20 minutes. 
 
Grill the chicken: Leave the burner on one side of the grill on high, and turn off the burner on the other side of the grill.  Place the chicken skin-side down over the cooler side of the grill, with the legs facing the fire.  Place the hot bricks length-wise over each breast.  Cover the grill and cook until the skin is lightly browned, about 22-25 minutes.  Remove the bricks.  Flip the chicken to skin-side up, with the legs again facing the fire.  (The chicken should release freely and not stick to the grates.  If it does stick, use a metal spatula to gently loosen it.)  Place the bricks over the breast, cover the grill, and continue to cook until the chicken is well browned, about 12-15 minutes.  Remove the bricks, and flip the chicken again to skin-side down, this time placing the chicken directly over the flame.   Grill until the chicken skin is browned and crispy, and a thermometer placed into the thickest part of the thigh registers 165ᵒF, about 5-10 minutes. 
 
Transfer the chicken to a cutting board and let rest 10 minutes.  Carve the chicken into 10 pieces (2 legs, 2 thighs, 2 wings and 2 breasts cut in half ).  Brush the pieces with the reserved flavored oil.  Serve hot.
 
An extra grilling tip:  I always like to have a spray bottle of water handy, whenever I grill.  As fat melts off the meat and drips into the flame, flare-ups inevitably occur, which can quickly and thoroughly burn the surface of the meat.  A few quick sprays of water takes care of any flare-up.  This little trick has been a lifesaver for me, again and again. 


Asparagus Panzanella
Adapted from Chef Jen Irwin at Just a Taste restaurant in Ithaca, NY
Serves 4-6
 
Asparagus Panzanella
 
1 bunch asparagus
2 tsp extra-virgin olive oil
kosher salt & freshly ground black pepper, to taste
1/2 small red onion, peeled and thinly sliced
12 oz bocconcini fresh mozzarella, sliced into quarters *
2 oz parmesan, finely shaved into thin ribbons
 
For the croutons:
3 Tbl red wine vinegar
1/4 cup butter, melted
1/4 cup extra-virgin olive oil
8 cups French bread (about 3/4 baguette) sliced into 1/2-inch cubes
kosher salt and freshly ground black pepper, to taste
1/3 cup finely grated parmesan
 
First, prep and roast the asparagus:  Preheat the oven to 375°F.  To determine where to trim off the bottoms of the asparagus (The bottoms of the stems are tough and woody but the tops are tender), take one stem and holding the bottom of the stem in one hand and the middle in the other, bend the stem.  It will snap right at the point where tough turns to tender.  Line up the rest of the asparagus so their tips align, and slice off their bottom portions at the same point where the first one snapped.  Slice the asparagus on a slight diagonal into 2-inch slices.  Preheat the oven to 375°F.  Arrange the asparagus over a parchment-lined sheet tray.  Lightly drizzle with extra-virgin olive oil. Use your clean hands to toss the asparagus with the oil, to lightly and evenly coat them.  Sprinkle evenly with a pinch of salt and a few grinds of pepper.  Roast in the oven until the asparagus is tender and just beginning to turn light golden brown, about 15 minutes.  Reserve
 
Meanwhile, prep all the other ingredients:  Slice the onions, grate the parmesan and quarter the fresh mozzarella. 
 
Now, make the croutons:  In a large mixing bowl, combine the vinegar, melted butter and olive oil.  Season with a bit of salt and pepper.  Whisk to combine.  Add the cubed bread to the vinaigrette and immediately toss it with your hands to coat.  Add the parmesan and toss again to coat the bread with the cheese.  Arrange the dressed bread cubes over a parchment paper-lined baking sheet and bake in the oven until golden brown and crunchy, but still soft and tender on the inside, about 10-15 minutes. 
 
Assemble the salad:  In a large mixing bowl, combine the toasted croutons with the roasted asparagus, sliced red onion, fresh mozzarella and parmesan.  Toss together with a rubber spatula.  Serve warm.
 
* Bocconcini refers to the shape of the mozzarella.  You want to the small (grape-size) round balls of fresh mozzarella.


Bitter Greens Salad
Serves 4
 
Bitter Greens Salad
1 tsp Dijon mustard
2 Tbl red wine vinegar
1 tsp fresh thyme leaves, chopped
1 small clove garlic, peeled & finely minced
2 Tbl extra-virgin olive oil
2 Tbl vegetable oil
1/2 head radicchio, sliced into bite-sized pieces
1 head endive, sliced into bite-sized pieces
1 large handful baby arugula
kosher salt & freshly ground black pepper, to taste
 
Combine the mustard, vinegar, thyme, garlic, a good pinch of salt and a few grinds of pepper in a mixing bowl.  Whisk together, and slowly pour in the olive oil, then the vegetable oil, both in a thin stream and whisking as you pour.  The dressing can be made ahead and stored about five days, refrigerated in an airtight container.

Place the greens in a large mixing bowl.  Drizzle the vinaigrette over the top, enough to evenly coat the greens – You man not need to use it all.  Season with salt and pepper and toss to coat.  Serve immediately. 


Orange-Chocolate Mousse
Adapted from Barefoot in Paris by Ina Garten
Serves 8
 
Orange-Chocolate Mousse
 
6 oz semi-sweet chocolate, chopped
2 oz bitter-sweet chocolate, chopped
1/4 cup Grand Marnier liqueur
1/4 cup water
1 tsp vanilla extract
1 tsp finely grated orange zest
1 1/2 sticks unsalted butter, room temperature
10 large eggs, room temperature, yolks and whites separated
1/2 cup plus 2 Tbl sugar
pinch of kosher salt
1/2 cup whipping cream
whipped cream, sliced orange segments and thinly-sliced orange zest, for garnish
 
Combine the semi-sweet and bitter-sweet chocolates, the Grand Marnier, hater and vanilla in a heat-proof bowl.  Place over a pot of simmering water, and stir frequently until the chocolate melts and the mixture is smooth.  Cool completely to room temperature.  Then add the orange zest and butter and stir until well combined. 
 
Place the egg yolks and 1/2 cup of sugar in the bowl of an electric stand mixer fitted with the paddle attachment.  Beat on high until thick and fluffy and pale yellow, about four minutes.  With the mixer running on low speed, add the chocolate mixture.  Mix until combined, then transfer to a large mixing bowl. 
 
Place 1 cup of the egg whites (You wont need all of the egg whites - save or discard the rest.), the salt and 1 Tbl sugar in a clean bowl of the electric mixer, fitted now with the whisk attachment.  Whisk on high speed until the egg whites come to stiff peaks.  Whisk half of the egg whites into the chocolate mixture.  Then using a rubber spatula, fold in the rest.
 
Again using the electric mixer and whisk attachment, whip the 1/2 cup heavy cream and the remaining 1 Tbl sugar until thick and fluffy.  (There’s no need to clean the bowl or whisk before whipping the cream.)  Fold the whipped cream into the chocolate mixture.
 
Pour the mousse into eight individual dishes.  Chill in the refrigerator, at least two hours.  Before serving, garnish with whipped cream (recipe below), sliced orange segments and thinly-sliced orange zest.
 

For the whipped cream:
1 cup heavy whipping cream
1 Tbl sugar
1 tsp vanilla

Whip the cream to soft peaks (When you stick a spoon into the cream and lift it out, a point will form then droop down after a second or two).  Add sugar and vanilla and whip to firm peaks (The point formed in the cream will stand straight up and not fall over).